To be clear, there are many processes for storing and searching files. A popular one today uses Adobe Lightroom (LR). However, these tips are intended for those that don’t use LR or are just looking for a simple file management system using your existing Windows functionality (also works well for Mac). Good images, no matter how old, should be easily reached at all times and stored in a way that is reliable and safe. Storing and managing images is like anything else. It starts with a well-thought out plan. Images need to be searchable, quick to bring up, and safe.

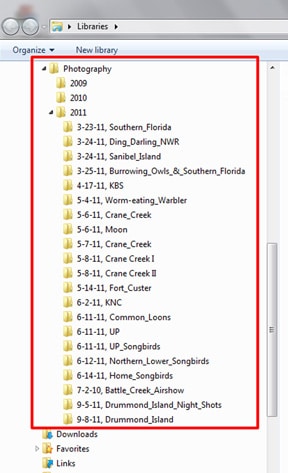
Now comes the hierarchy of folders: Think of this as a tree diagram. The top folder would be called “Photography,” while the next folders within would be named as years (ex. “2009”, “2010”, “2011”, etc.) Within those year folders would be more folders that would be titled with the date of shoot and a rough synopsis of the shoot (i.e. “5-4-11, Worm-eating_Warbler” or “3-17-12, Jasper Pulaski Sandhill Cranes, Northern Harriers and Song Sparrow”). Think of these folders as albums. Within that folder/album would be where all your images are actually stored from the particular shoot (see accompanying photo to see example structure). I also keep albums small so there may end up being mutliple “album” folders per day but one might have all shorebirds, another raptors and so on. This makes finding images of particular species or family much easier later.

When all said and done, keep things simple and use good titles for folders that are easily searched. If your current process isn’t working, ask around and find out what others are doing so you can make the decision on what process is best for you.

